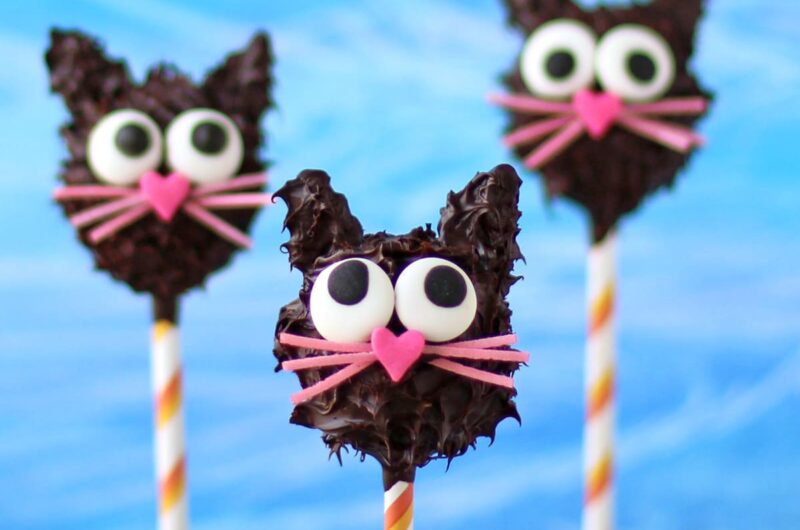
When it comes to fun, festive, and no-bake Halloween treats, Black Cat Oreo Pops take the spotlight. These adorable (and slightly spooky) pops are made by transforming classic Oreo cookies into cute black cats with the help of melted chocolate, candy eyes, and candy decorations.
They’re perfect for parties, trick-or-treat gatherings, or even as a creative kitchen project with kids. Not only do they look whimsical and festive, but they also taste like a chocolate-lover’s dream—crunchy Oreos coated in smooth chocolate with sweet candy details. These pops make dessert time interactive and exciting, instantly putting everyone in the Halloween spirit.
Why We Love This Recipe
We love this recipe because it’s easy, no-bake, and irresistibly fun. The Oreo pops are quick to prepare yet look like they came straight from a bakery. Kids adore making them, adults enjoy eating them, and they double as party décor on a dessert table. Unlike elaborate cakes or pies, these pops don’t require special baking skills, yet they still bring a big “wow” factor.
Plus, who doesn’t love Oreos dipped in chocolate? The playful cat faces, with candy eyes and ears, make each pop unique and charming.
Why It’s a Must-Try Dish
This recipe is a must-try because it blends creativity and flavor in the most delightful way. Perfect for Halloween parties, school events, or gifting, these pops are crowd-pleasers for all ages. They’re also highly customizable—you can change the cat’s expressions, ear styles, or even add sprinkles for a bit of sparkle.
The pops make for a hands-on activity, so it’s a fantastic recipe to prepare with children or friends. Ultimately, it’s a treat that combines fun, flavor, and festivity in one bite.
Recipe Details:
- Preparation Time: 25 minutes
- Chilling Time: 15 minutes
- Total Time: 40 minutes
- Servings: 12 Oreo pops
- Calories: ~160–180 per pop (depending on candy decorations)
- Course: Dessert / Snack
- Cuisine: American
Ingredients
For the Oreo Pops:
- 12 Oreo cookies (regular or Double Stuf for better stick stability)
- 1 ½ cups (250g) semisweet or black candy melts (for coating)
- 12 lollipop sticks or paper straws
- 24 candy eyes
- 24 small chocolate chips (for ears) or black licorice triangles
- 12 pink candy-coated chocolates (for noses, e.g., mini M&Ms)
Optional Decorations:
- Black sanding sugar or edible glitter (for sparkle)
- Melted white or dark chocolate (for whiskers or details)
Quick Directions
- Separate Oreos, insert sticks, and reseal.
- Dip in melted candy coating until fully covered.
- Decorate with candy eyes, chocolate chip ears, and candy nose.
- Chill until set.
Step-by-Step Preparation:
Step 1: Prep the Oreos
- Carefully twist open each Oreo.
- Place the end of a lollipop stick into the cream filling.
- Press gently and replace the Oreo cookie top, sandwiching the stick inside.
- Chill for 5 minutes to firm.
Step 2: Coat the Pops
- Melt candy melts in a microwave-safe bowl in 30-second bursts, stirring until smooth.
- Dip each Oreo pop into melted coating, covering completely.
- Tap gently to remove excess coating.
Step 3: Add Decorations
- Before the coating sets, press on two candy eyes.
- Attach two chocolate chips (point side up) as ears.
- Add a pink candy nose in the center.
- Optional: Use melted chocolate to pipe whiskers or a mouth.
Step 4: Chill & Set
- Place pops upright in a Styrofoam block or lay flat on wax paper.
- Chill in the refrigerator for 10–15 minutes, until coating is firm.
How to Serve
Serve the pops upright in a decorated jar filled with candy corn or display them on a festive platter. They work wonderfully as party favors, trick-or-treat handouts (individually wrapped), or as part of a dessert buffet.
Tips for the Recipe:
- Use Double Stuf Oreos—they hold the sticks better.
- If Oreos crack when inserting sticks, dip the stick in melted candy before inserting to act as glue.
- Work quickly when decorating; candy coating sets fast.
- Add whiskers with black licorice strings for extra detail.
Variations:
- Pumpkin Pops: Use orange candy melts and candy leaves instead of cat features.
- Ghost Pops: Coat Oreos in white candy melts, add candy eyes and a little mouth.
- Glitter Cats: Sprinkle edible black glitter before the coating hardens for a magical look.
- Vegan Version: Use vegan-friendly Oreos, dairy-free chocolate, and allergen-free candy eyes.
Freezing & Storage
- Storage: Keep in an airtight container at room temperature for up to 3 days or in the fridge for up to 1 week.
- Freezing: Not recommended, as Oreos can lose their crunch and decorations may discolor when thawed.
Special Equipment Needed
- Lollipop sticks or paper straws
- Microwave-safe bowl
- Wax/parchment paper or Styrofoam block
- Small piping bag (optional, for details)
FAQ:
Q1: Can I use white chocolate instead of candy melts?
Yes, but add a little shortening or coconut oil to thin it for dipping.
Q2: Can I make these ahead of time?
Yes, up to 2–3 days in advance. Store in an airtight container.
Q3: What if I don’t have lollipop sticks?
You can use paper straws or even popsicle sticks as an alternative.
Q4: Can kids help with this recipe?
Definitely! This recipe is very kid-friendly and fun for decorating.
Conclusion
Black Cat Oreo Pops are the ultimate Halloween party treat—adorable, spooky, and delightfully simple to make. With their crunchy Oreo base, smooth chocolate coating, and playful candy decorations, they’re as fun to look at as they are to eat. Whether you’re planning a party, making festive treats for kids, or just love themed desserts, these Oreo pops will bring joy and excitement to the table. Easy, festive, and delicious—this recipe is truly a must-try!
Black Cat Oreo Pops
Course: Desserts, SnacksCuisine: AmericanDifficulty: Easy12 Oreo pops
servings25
minutes15
minutes40
minutesWhen it comes to fun, festive, and no-bake Halloween treats, Black Cat Oreo Pops take the spotlight. These adorable (and slightly spooky) pops are made by transforming classic Oreo cookies into cute black cats with the help of melted chocolate, candy eyes, and candy decorations.
Ingredients
- For the Oreo Pops:
12 Oreo cookies (regular or Double Stuf for better stick stability)
1 ½ cups (250g) semisweet or black candy melts (for coating)
12 lollipop sticks or paper straws
24 candy eyes
24 small chocolate chips (for ears) or black licorice triangles
12 pink candy-coated chocolates (for noses, e.g., mini M&Ms)
- Optional Decorations:
Black sanding sugar or edible glitter (for sparkle)
Melted white or dark chocolate (for whiskers or details)
Directions
- Prep the Oreos Carefully twist open each Oreo. Place the end of a lollipop stick into the cream filling. Press gently and replace the Oreo cookie top, sandwiching the stick inside. Chill for 5 minutes to firm.
- Coat the Pops Melt candy melts in a microwave-safe bowl in 30-second bursts, stirring until smooth. Dip each Oreo pop into melted coating, covering completely. Tap gently to remove excess coating.
- Add Decorations Before the coating sets, press on two candy eyes. Attach two chocolate chips (point side up) as ears. Add a pink candy nose in the center. Optional: Use melted chocolate to pipe whiskers or a mouth.
- Chill & Set Place pops upright in a Styrofoam block or lay flat on wax paper. Chill in the refrigerator for 10–15 minutes, until coating is firm.