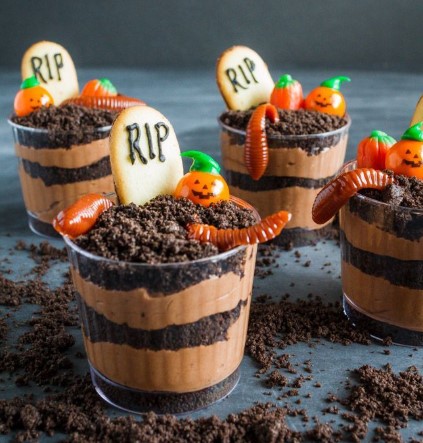
Halloween is the season of imagination, where even desserts get dressed up for the spooky occasion. Haunted Graveyard Chocolate Pudding Cups are the perfect example of a playful, no-bake Halloween treat. With rich chocolate pudding, crushed cookie “dirt,” and spooky edible decorations like candy pumpkins and tombstone cookies, these pudding cups look like mini haunted graveyards straight from a Halloween movie set.
What makes this recipe truly special is its balance of fun and flavor—it’s delicious enough to satisfy your sweet tooth and creative enough to wow guests at a Halloween party. Kids will love the edible decorations, while adults will appreciate the nostalgic comfort of creamy chocolate pudding with crunchy cookie topping.
Why We Love This Recipe
We love this recipe because it’s both festive and foolproof. It doesn’t require baking, it’s quick to assemble, and you can personalize each cup to your liking. It’s also a dessert that doubles as a craft activity—kids can help decorate their own pudding “graveyards,” making it an interactive treat.
The combination of smooth, creamy pudding with crushed cookie crumbs and candy decorations creates a textural and flavorful balance. Plus, it’s endlessly versatile—you can make it from scratch or take shortcuts with store-bought pudding and cookies.
Why It’s a Must-Try Dish
This is a must-try Halloween recipe because:
- It’s themed, adorable, and party-ready.
- It’s a no-bake recipe, perfect for busy schedules.
- It can be customized for kids or adults with different toppings.
- It’s a treat that looks spooky but tastes indulgent and comforting.
It’s not just a dessert—it’s a centerpiece for your Halloween table.
Recipe Information:
- Preparation Time: 20 minutes
- Cooking Time: 0 minutes
- Total Time: 20 minutes
- Servings: 6 cups
- Calories (per serving): ~300 kcal
Course and Cuisine
- Course: Dessert / Snack
- Cuisine: American (Halloween-Inspired)
Ingredients
- 1 box (3.9 oz) instant chocolate pudding mix
- 2 cups cold milk
- 1 cup whipped topping (optional for extra creaminess)
- 18 chocolate sandwich cookies (like Oreos), crushed into crumbs
- 6 rectangular cookies (like Milano or Vienna fingers) for “tombstones”
- Black decorating gel (for writing on tombstones)
- Halloween candies (gummy worms, candy pumpkins, candy bones, etc.)
- 6 clear plastic cups or small glass jars
Quick Directions
- Prepare pudding mix with cold milk and let set.
- Crush cookies into fine crumbs.
- Fill cups with pudding, top with cookie crumbs.
- Decorate with tombstone cookies, gummy worms, and candy pumpkins.
- Serve immediately or chill until ready.
Step-by-Step Preparation:
- Make the Pudding: In a medium mixing bowl, whisk pudding mix with cold milk until smooth. Let it set for 5 minutes. Optional: fold in whipped topping for extra creaminess.
- Prepare Cookie Dirt: Place chocolate sandwich cookies in a zip-top bag and crush with a rolling pin until fine crumbs form.
- Layer the Cups: Spoon pudding evenly into clear cups or jars, filling each about ⅔ full.
- Add the Dirt: Sprinkle a generous layer of cookie crumbs on top to resemble soil.
- Create Tombstones: Write “RIP” or spooky words on rectangular cookies using black decorating gel. Insert them into each cup to stand upright like tombstones.
- Decorate: Add gummy worms crawling out of the dirt, candy pumpkins, and any other Halloween-themed candies.
- Serve or Chill: These can be served right away or refrigerated for up to 2 hours before serving.
How to Serve
- Serve in clear cups for a visual spooky effect.
- Pair with a Halloween party platter filled with other themed snacks.
- Add plastic spoons with Halloween-themed decorations for extra fun.
Tips for this Recipe:
- Use clear cups or jars so guests can see the layered effect.
- Let kids decorate their own pudding cups as a fun Halloween activity.
- For neat cookie tombstones, write the lettering ahead of time and let it dry before inserting.
- Crush cookies finely for a dirt-like look, but leave a few larger pieces for texture.
Variations:
- Adult Version: Add a splash of coffee liqueur or Bailey’s to the pudding.
- Healthy Twist: Use Greek yogurt instead of pudding and crushed graham crackers instead of sandwich cookies.
- Different Flavors: Try butterscotch pudding for a lighter “sand” graveyard look.
- Themed Toppings: Use marshmallow ghosts, candy eyeballs, or chocolate bones for variety.
Freezing and Storage
- Storage: Store in the refrigerator for up to 2 days (best eaten fresh).
- Freezing: Not recommended, as pudding and whipped cream lose texture when frozen.
Special Equipment Needed
- Mixing bowl and whisk
- Rolling pin or food processor (for crushing cookies)
- Clear plastic cups or glass jars
- Piping bag or gel pen for writing on tombstones
FAQ:
Q1: Can I make this recipe ahead of time?
Yes! You can prepare the pudding and cookie crumbs a day in advance. Assemble the cups up to 2 hours before serving to keep the toppings fresh.
Q2: Do I have to use instant pudding?
Not at all. You can make homemade chocolate pudding if you prefer. Instant pudding is just a quicker option.
Q3: Can I use something other than sandwich cookies for the dirt?
Yes! Chocolate graham crackers or brownies crumbled into small pieces work well too.
Q4: How can I make this allergy-friendly?
Use gluten-free cookies, dairy-free pudding mix, and coconut whipped cream for a completely allergy-friendly dessert.
Conclusion
Haunted Graveyard Chocolate Pudding Cups are the ultimate no-fuss Halloween dessert—cute, creepy, and utterly delicious. They combine rich chocolate pudding with crunchy cookie “dirt” and fun edible decorations that capture the spooky spirit of the season.
Whether you’re hosting a Halloween party, preparing classroom treats, or looking for a festive family dessert, these pudding cups are a must-try. They’re easy, customizable, and guaranteed to put smiles (and maybe a few playful shivers) on everyone’s faces.
Haunted Graveyard Chocolate Pudding Cups
Course: Desserts, snackCuisine: American (Halloween-Inspired)Difficulty: Easy6 cups
servings20
minutes20
minutesHalloween is the season of imagination, where even desserts get dressed up for the spooky occasion. Haunted Graveyard Chocolate Pudding Cups are the perfect example of a playful, no-bake Halloween treat.
Ingredients
1 box (3.9 oz) instant chocolate pudding mix
2 cups cold milk
1 cup whipped topping (optional for extra creaminess)
18 chocolate sandwich cookies (like Oreos), crushed into crumbs
6 rectangular cookies (like Milano or Vienna fingers) for “tombstones”
Black decorating gel (for writing on tombstones)
Halloween candies (gummy worms, candy pumpkins, candy bones, etc.)
6 clear plastic cups or small glass jars
Directions
- Make the Pudding: In a medium mixing bowl, whisk pudding mix with cold milk until smooth. Let it set for 5 minutes. Optional: fold in whipped topping for extra creaminess.
- Prepare Cookie Dirt: Place chocolate sandwich cookies in a zip-top bag and crush with a rolling pin until fine crumbs form.
- Layer the Cups: Spoon pudding evenly into clear cups or jars, filling each about ⅔ full.
- Add the Dirt: Sprinkle a generous layer of cookie crumbs on top to resemble soil.
- Create Tombstones: Write “RIP” or spooky words on rectangular cookies using black decorating gel. Insert them into each cup to stand upright like tombstones.
- Decorate: Add gummy worms crawling out of the dirt, candy pumpkins, and any other Halloween-themed candies.
- Serve or Chill: These can be served right away or refrigerated for up to 2 hours before serving.