Introduction
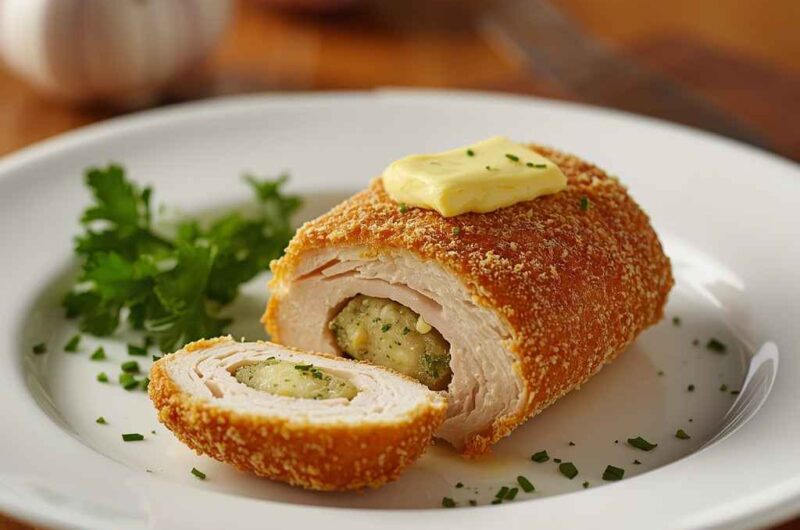
Chicken Kiev is a beloved Eastern European dish that has gained worldwide fame for its irresistible combination of crispy breadcrumb coating, juicy chicken, and molten garlic-herb butter. When you cut into the golden crust, the warm, aromatic butter flows out like a sauce, creating a moment of pure indulgence.
Originating from Ukrainian and Russian cuisine, this elegant yet hearty dish has been a fine-dining favorite for decades. Whether served at a dinner party or as a special family meal, Chicken Kiev is a culinary showstopper.
Why I Love This Recipe
I love Chicken Kiev because it’s a beautiful mix of textures and flavors: the buttery center melts into the chicken, infusing it with garlic and herbs, while the crunchy breadcrumb crust gives each bite the perfect contrast.
It’s also incredibly rewarding to make from scratch—forming the butter filling, rolling the chicken tightly, and frying to golden perfection feels like an accomplishment. Plus, it’s versatile enough to serve with mashed potatoes, rice, or even a crisp salad.
Why It’s a Must-Try Dish
- Garlic Butter Magic: The melting butter filling takes this chicken to another level.
- Crispy Outside, Juicy Inside: Perfect texture in every bite.
- Elegant but Comforting: Ideal for special occasions or an indulgent weekend dinner.
- Surprisingly Make-Ahead Friendly: You can freeze the chicken before cooking and fry when ready.
- A True Classic: Mastering this dish is a proud moment for any home cook.
Preparation and Cooking Time
- Preparation Time: 30 minutes (plus 30 minutes chilling)
- Cooking Time: 25 minutes
- Total Time: ~1 hour 25 minutes
Servings and Nutrition
- Servings: 4
- Calories: ~530 kcal per serving (varies with oil and butter amount)
Course & Cuisine
- Course: Main Course
- Cuisine: Eastern European / Ukrainian / Russian
Ingredients
For the Garlic Herb Butter Filling
- 8 tbsp (1 stick / 115 g) unsalted butter, softened
- 2 garlic cloves, finely minced
- 1 tbsp fresh parsley, finely chopped
- 1 tbsp fresh dill, finely chopped (optional but traditional)
- 1 tsp lemon juice
- ½ tsp salt
- ¼ tsp black pepper
For the Chicken
- 4 boneless, skinless chicken breasts
- Salt and black pepper, to season
For the Coating
- ½ cup all-purpose flour
- 2 large eggs, beaten
- 1 tbsp milk
- 1½ cups breadcrumbs (panko or regular, depending on desired crispness)
- ½ tsp paprika (optional, for color)
- Vegetable oil, for frying
Cooking Directions (Overview)
- Make the garlic herb butter and freeze.
- Pound the chicken breasts thin.
- Roll chicken around the butter filling and chill.
- Bread the chicken (flour, egg, breadcrumbs).
- Fry until golden, then finish in the oven.
- Serve hot with sides of your choice.
Step-by-Step Preparation Method
Step 1: Prepare the Garlic Herb Butter
- In a bowl, mix softened butter, minced garlic, parsley, dill, lemon juice, salt, and black pepper.
- Place the mixture on a piece of plastic wrap and roll it into a tight log.
- Freeze for 20–30 minutes, until firm enough to slice.
Step 2: Prepare the Chicken
- Place a chicken breast between two sheets of plastic wrap.
- Using a meat mallet or rolling pin, pound the chicken to about ¼-inch thickness, being careful not to tear it.
- Season both sides lightly with salt and pepper.
- Repeat for all chicken breasts.
Step 3: Fill and Roll the Chicken
- Slice the chilled butter log into 4 equal pieces.
- Place a butter piece in the center of each flattened chicken breast.
- Fold the sides over the butter, then roll tightly from the bottom up, sealing the butter completely.
- Use toothpicks if needed to secure the roll.
- Place the rolled chicken on a tray and freeze for 20–30 minutes — this helps keep the butter from leaking during cooking.
Step 4: Bread the Chicken
- Set up three shallow dishes: one with flour, one with beaten eggs + milk, and one with breadcrumbs mixed with paprika.
- Dredge each chicken roll first in flour, shaking off excess.
- Dip in the egg mixture to coat completely.
- Roll in breadcrumbs, pressing gently to ensure even coverage.
- Place on a plate and chill again for 10 minutes (optional but helps set the coating).
Step 5: Fry and Bake
- Preheat the oven to 180°C / 350°F.
- Heat about ½ inch of oil in a deep skillet over medium-high heat.
- Fry the chicken rolls for 2–3 minutes per side, turning until golden brown all over.
- Transfer the fried chicken to a baking sheet and bake for 12–15 minutes, or until the internal temperature reaches 165°F (74°C).
- Let rest for 5 minutes before serving. Remove toothpicks carefully.
How to Serve This Dish
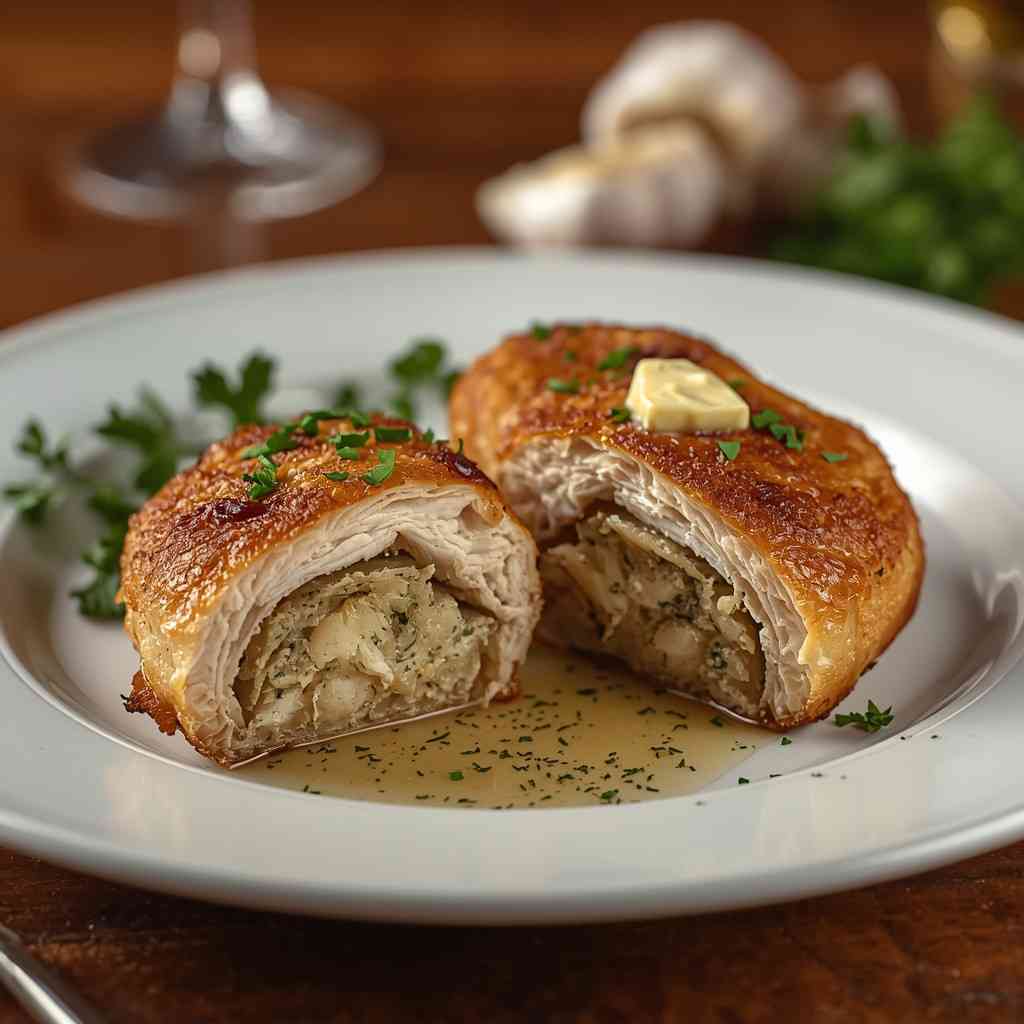
- Slice the Chicken Kiev at the table to reveal the molten garlic butter center — a real “wow” moment.
- Serve with:
- Creamy mashed potatoes
- Steamed green beans or asparagus
- A fresh garden salad
- A lemon wedge for brightness
- Drizzle any leaked butter from the tray over the chicken before serving.
Recipe Tips
- Chill the Butter: Firm butter prevents leaks during cooking.
- Season Each Step: Light seasoning of the chicken and breadcrumbs enhances flavor.
- Seal Tightly: Folding and rolling carefully keeps butter inside.
- Double Coating Option: For extra crispness, repeat egg + breadcrumb steps.
- Use Fresh Herbs: Fresh dill and parsley bring authentic flavor.
Variations
- Cheese Kiev: Add a bit of grated parmesan or cream cheese to the butter for a richer filling.
- Spicy Butter: Mix in chili flakes or cayenne for a kick.
- Mini Kiev Bites: Use chicken tenders to make appetizer-sized portions.
- Herb-Only Butter: Skip garlic for a milder, aromatic version.
- Air Fryer Option: Cook at 375°F (190°C) for 15–18 minutes, turning halfway through, for a lighter version.
Freezing & Storage
- Before Cooking: Breaded chicken Kiev can be frozen on a baking sheet, then stored in a freezer bag for up to 2 months. Cook from frozen, adding 5–7 extra minutes baking time.
- After Cooking: Store leftovers in the fridge for up to 2 days. Reheat in the oven to retain crispness.
- Avoid microwaving — it can cause the coating to become soggy and butter to leak out.
Special Equipment Needed
- Meat mallet or rolling pin
- Plastic wrap
- Toothpicks
- Deep skillet for frying
- Baking sheet
- Tongs or slotted spoon
FAQ
Q1: Why did my butter leak out?
This usually happens if the chicken isn’t sealed properly or wasn’t chilled enough. Make sure the edges overlap and freeze before frying.
Q2: Can I bake instead of frying?
Yes. Spray with oil and bake at 400°F (200°C) for 25–30 minutes. The crust won’t be as golden as frying, but still delicious.
Q3: What’s the difference between Chicken Kiev and Cordon Bleu?
Chicken Kiev has herb butter filling, while Cordon Bleu is filled with ham and cheese.
Q4: Can I use chicken thighs?
Boneless thighs can work but are trickier to roll. Breasts are recommended for classic shape and even cooking.
Conclusion
Chicken Kiev with Garlic Herb Butter Filling is a dish that beautifully combines culinary elegance with homestyle comfort. From the satisfying crunch of the coating to the rich, aromatic butter center, it’s a recipe that never fails to impress. Whether for a dinner party or a special family night, this classic dish delivers flavor and flair in every bite.
Mastering this recipe is like unlocking a little piece of European culinary tradition — and once you do, you’ll make it again and again.
Chicken Kiev with Garlic Herb Butter Filling
Course: Chicken RecipesCuisine: RussianDifficulty: easy4
servings1
hour25
minutes1
hour25
minutesIngredients
For the Garlic Herb Butter Filling
8 tbsp (1 stick / 115 g) unsalted butter, softened
2 garlic cloves, finely minced
1 tbsp fresh parsley, finely chopped
1 tbsp fresh dill, finely chopped (optional but traditional)
1 tsp lemon juice
½ tsp salt
¼ tsp black pepper
For the Chicken
4 boneless, skinless chicken breasts
Salt and black pepper, to season
For the Coating
½ cup all-purpose flour
2 large eggs, beaten
1 tbsp milk
1½ cups breadcrumbs (panko or regular, depending on desired crispness)
½ tsp paprika (optional, for color)
Vegetable oil, for frying
Directions
- Step 1: Prepare the Garlic Herb Butter : In a bowl, mix softened butter, minced garlic, parsley, dill, lemon juice, salt, and black pepper. Place the mixture on a piece of plastic wrap and roll it into a tight log. Freeze for 20–30 minutes, until firm enough to slice.
- Step 2: Prepare the Chicken : Place a chicken breast between two sheets of plastic wrap. Using a meat mallet or rolling pin, pound the chicken to about ¼-inch thickness, being careful not to tear it. Season both sides lightly with salt and pepper. Repeat for all chicken breasts.
- Step 3: Fill and Roll the Chicken : Slice the chilled butter log into 4 equal pieces. Place a butter piece in the center of each flattened chicken breast. Fold the sides over the butter, then roll tightly from the bottom up, sealing the butter completely. Use toothpicks if needed to secure the roll. Place the rolled chicken on a tray and freeze for 20–30 minutes — this helps keep the butter from leaking during cooking.
- Step 4: Bread the Chicken : Set up three shallow dishes: one with flour, one with beaten eggs + milk, and one with breadcrumbs mixed with paprika. Dredge each chicken roll first in flour, shaking off excess. Dip in the egg mixture to coat completely. Roll in breadcrumbs, pressing gently to ensure even coverage. Place on a plate and chill again for 10 minutes (optional but helps set the coating).
- Step 5: Fry and Bake : Preheat the oven to 180°C / 350°F. Heat about ½ inch of oil in a deep skillet over medium-high heat. Fry the chicken rolls for 2–3 minutes per side, turning until golden brown all over. Transfer the fried chicken to a baking sheet and bake for 12–15 minutes, or until the internal temperature reaches 165°F (74°C). Let rest for 5 minutes before serving. Remove toothpicks carefully.