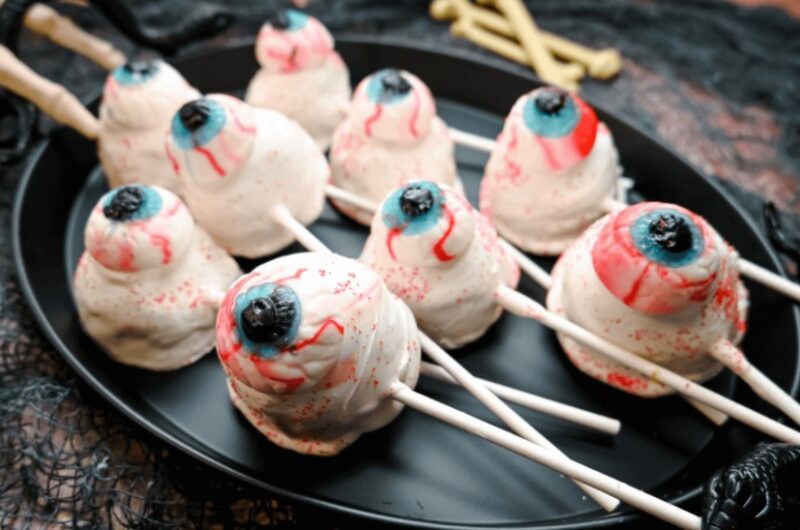
When it comes to Halloween treats, creativity is just as important as flavor—and these Haunted Eyeball Cake Pops deliver both! Moist cake crumbs are blended with creamy frosting, shaped into little balls, and coated in smooth white chocolate to resemble spooky eyeballs. Each cake pop is decorated with candy eyes and food coloring to mimic veins and irises, creating a creepy yet irresistibly fun dessert.
What makes these cake pops so delightful is that they balance both whimsy and indulgence. They’re bite-sized, portable, and perfect for parties, trick-or-treaters, or as an edible craft project with kids. Plus, their eerie appearance makes them the highlight of any Halloween dessert table.
Why We Love This Recipe
We love this recipe because it’s both creative and versatile. Cake pops are already a crowd favorite, but transforming them into haunted eyeballs takes them to a whole new spooky level. You get the fun of decorating while enjoying the rich, moist flavor of cake coated in chocolate.
It’s also a fantastic way to use up leftover cake or cupcakes—you simply crumble, mix, and decorate. The decorating process is interactive, making it perfect for family bonding or party prep with friends.
Why It’s a Must-Try Dish
- Eye-Catching (literally!) – A show-stopping Halloween centerpiece.
- Fun for All Ages – Decorating feels like arts and crafts you can eat.
- Portable Treats – Perfect for trick-or-treat bags or party platters.
- Customizable – Mix up colors and flavors to match your theme.
- Irresistible Flavor – Moist cake + creamy frosting + chocolate coating = perfection.
Recipe Information:
- Preparation Time: 30 minutes
- Chilling/Setting Time: 1 hour
- Total Time: ~1 hour 30 minutes
- Servings: 20–24 cake pops
- Calories: ~160 kcal per cake pop
Course and Cuisine
- Course: Dessert / Party Treat
- Cuisine: American (Halloween Themed)
Ingredients
For the Cake Pops:
- 1 box chocolate or vanilla cake mix (plus ingredients to prepare) OR 4 cups crumbled baked cake
- ½ cup frosting (vanilla or cream cheese works best)
For Decoration:
- 2 cups white candy melts (or white chocolate)
- ½ cup colored candy melts (blue, green, or red for iris designs)
- Red food coloring gel (for veins)
- Edible candy eyes (or dark chocolate chips for pupils)
- Cake pop sticks
Quick Directions
- Bake and crumble cake.
- Mix with frosting until dough-like.
- Shape into balls and chill.
- Insert sticks, dip in melted white chocolate.
- Decorate with candy eyes, iris colors, and red veins.
- Chill until set.
Step-by-Step Preparation:
Step 1: Make the Cake Mixture
- Bake a cake according to package or recipe. Let cool completely.
- Crumble cake into fine crumbs in a large bowl.
- Add frosting gradually, mixing until the mixture holds together like dough.
Step 2: Shape and Chill
- Roll mixture into 1-inch balls.
- Place on a parchment-lined tray.
- Chill in the fridge for 30 minutes (or 15 in the freezer).
Step 3: Prepare Sticks
- Melt a little white chocolate.
- Dip one end of each cake pop stick into the chocolate, then insert into each cake ball (this helps secure it).
- Chill again for 10 minutes.
Step 4: Coat the Cake Pops
- Melt white candy melts until smooth.
- Dip each cake pop fully into the melted coating, tapping off excess.
- Place upright in a cake pop stand or styrofoam block to set.
Step 5: Decorate the Eyeballs
- Attach a candy eye or dot melted dark chocolate for pupils.
- Use colored candy melts to add an iris ring around the pupil.
- With a toothpick dipped in red food gel, draw thin squiggly lines for veins.
How to Serve
- Serve upright in a spooky-themed cake pop stand or arrange on a platter with “blood-red” raspberry sauce splatter for extra effect.
- Pair with Halloween punch or hot cocoa.
- Great for party favors when wrapped in clear cellophane with festive ribbons.
Tips for this Recipe:
- Don’t add too much frosting—just enough to bind the crumbs. Too much makes them mushy.
- Work with chilled cake pops for easier dipping.
- If candy coating is too thick, add a teaspoon of vegetable shortening to thin it.
- Use edible markers for easy and neat vein decorations.
Variations:
- Bloody Eyeballs: Dip cake pops in red candy melts before adding pupils.
- Monster Eyes: Use green, orange, or purple coating instead of white.
- Flavor Twist: Try red velvet cake for a creepier effect.
- Gluten-Free: Use a gluten-free cake mix.
Freezing and Storage
- Storage: Keep decorated cake pops in an airtight container at room temperature for up to 3 days.
- Refrigeration: Store up to 1 week in the fridge.
- Freezing: Undecorated cake balls can be frozen for up to 2 months. Thaw, then dip and decorate.
Special Equipment Needed
- Cake pop sticks
- Styrofoam block or cake pop stand
- Parchment paper
- Microwave-safe bowls (for melting candy melts)
FAQ:
Q1: Can I use homemade cake instead of boxed mix?
Yes! Any cake works—just make sure it’s moist enough to crumble.
Q2: What if I don’t have candy eyes?
You can use a drop of melted chocolate with a mini white candy melt as a pupil.
Q3: Why are my cake pops falling off the sticks?
They may be too heavy with frosting or not chilled enough. Try adding less frosting and chilling longer.
Q4: Can I make these in advance?
Yes! You can prepare cake balls a day ahead, then dip and decorate the next day.
Conclusion
These Haunted Eyeball Cake Pops are the perfect Halloween treat—creepy, creative, and oh-so delicious. With their moist cake centers, sweet frosting, and chocolate coating, they’re guaranteed to be a hit with kids and adults alike. Easy to customize and fun to decorate, they’re more than just a dessert—they’re an activity and a party highlight. Whether you’re hosting a spooky bash or just want to make Halloween night extra special, these cake pops are a must-try treat.
Haunted Eyeball Cake Pops
Course: Desserts, Party TreatCuisine: American (Halloween Themed)Difficulty: Easy20–24 cake pops
servings30
minutes1
hour1
hour30
minutesWhen it comes to Halloween treats, creativity is just as important as flavor—and these Haunted Eyeball Cake Pops deliver both! Moist cake crumbs are blended with creamy frosting, shaped into little balls, and coated in smooth white chocolate to resemble spooky eyeballs.
Ingredients
- For the Cake Pops:
1 box chocolate or vanilla cake mix (plus ingredients to prepare) OR 4 cups crumbled baked cake
½ cup frosting (vanilla or cream cheese works best)
- For Decoration:
2 cups white candy melts (or white chocolate)
½ cup colored candy melts (blue, green, or red for iris designs)
Red food coloring gel (for veins)
Edible candy eyes (or dark chocolate chips for pupils)
Cake pop sticks
Directions
- Make the Cake Mixture Bake a cake according to package or recipe. Let cool completely. Crumble cake into fine crumbs in a large bowl. Add frosting gradually, mixing until the mixture holds together like dough.
- Shape and Chill Roll mixture into 1-inch balls. Place on a parchment-lined tray. Chill in the fridge for 30 minutes (or 15 in the freezer).
- Prepare Sticks Melt a little white chocolate. Dip one end of each cake pop stick into the chocolate, then insert into each cake ball (this helps secure it). Chill again for 10 minutes.
- Coat the Cake Pops Melt white candy melts until smooth. Dip each cake pop fully into the melted coating, tapping off excess. Place upright in a cake pop stand or styrofoam block to set.
- Decorate the Eyeballs Attach a candy eye or dot melted dark chocolate for pupils. Use colored candy melts to add an iris ring around the pupil. With a toothpick dipped in red food gel, draw thin squiggly lines for veins.