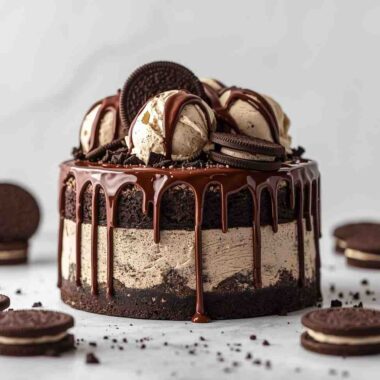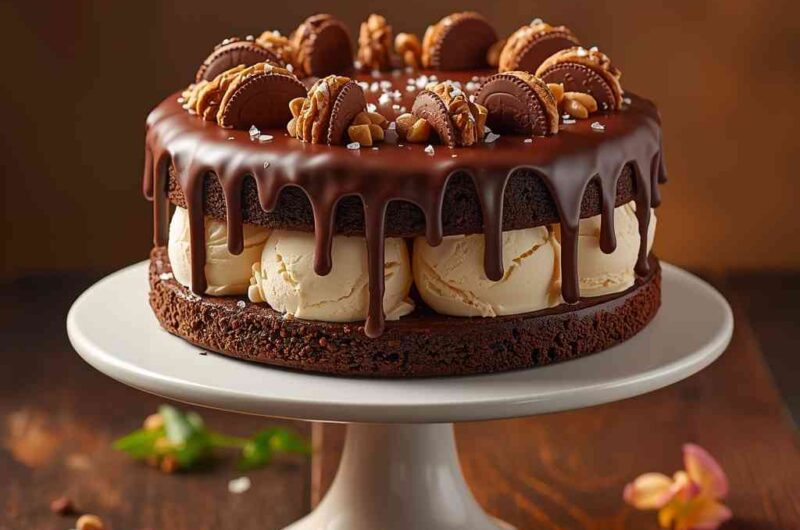
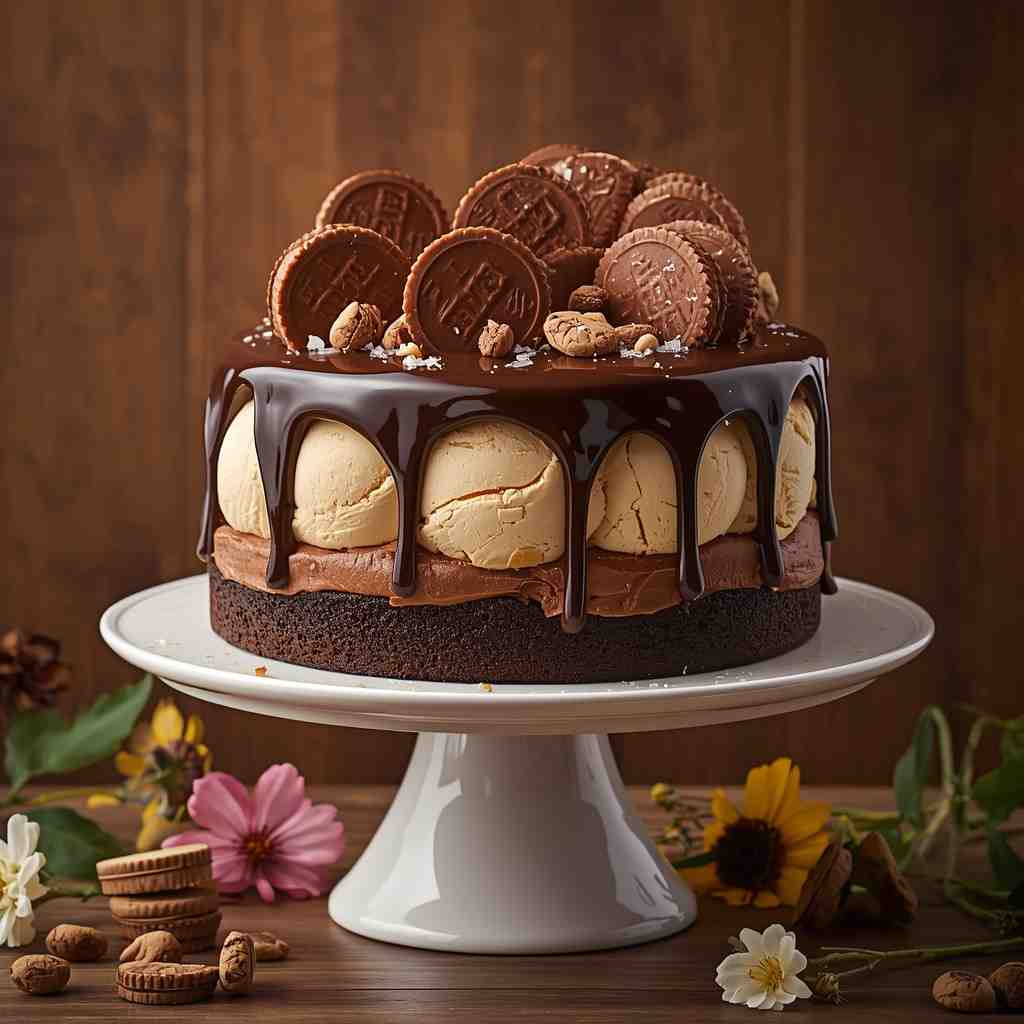
Few desserts capture pure decadence quite like a Peanut Butter Cup Ice Cream Cake. It’s everything a dessert lover could dream of: creamy layers of peanut butter and chocolate ice cream, crunchy cookie crust, rich chocolate fudge, and chunks of peanut butter cups scattered throughout. Every bite is a perfect harmony of sweet, salty, creamy, and crunchy.
This cake combines the classic flavor pairing of chocolate and peanut butter in the most delightful way. It’s cool, luscious, and deeply satisfying—a frozen treat that feels indulgent but is surprisingly easy to make. Whether you’re celebrating a birthday, hosting a dinner party, or just treating yourself, this dessert never fails to impress.
Why I Love This Recipe
I love this recipe because it’s the ultimate celebration of comfort and indulgence. There’s something nostalgic about peanut butter cups—the creamy peanut butter center surrounded by rich chocolate. When those flavors are layered into a frozen ice cream cake, the result is pure bliss.
Another reason I adore this recipe is its simplicity. It looks like a fancy bakery dessert, but it requires no baking and only a few simple steps. It’s customizable, make-ahead friendly, and guaranteed to please everyone at the table—from kids to adults
Why It’s a Must-Try Dish
This Peanut Butter Cup Ice Cream Cake is a must-try for several reasons:
- It’s a no-bake dessert, making it easy and stress-free.
- Combines two classic flavors—peanut butter and chocolate—in a show-stopping presentation.
- It’s perfect for summer, birthdays, or any special occasion.
- It’s make-ahead, meaning you can prepare it a day (or two) before serving.
- It’s decadent but balanced—sweet, salty, creamy, and rich in every spoonful.
This dessert is proof that sometimes, simple ingredients create the most extraordinary results.
Preparation and Cooking Details
- Preparation Time: 30 minutes
- Freezing/Chilling Time: 6 hours (or overnight for best results)
- Total Time: 6½ hours
- Servings: 10–12 slices
- Course: Dessert
- Cuisine: American
- Calories: ~500 kcal per serving
Ingredients
For the Crust:
- 24 chocolate sandwich cookies (like Oreos), crushed into crumbs
- ¼ cup (60g) unsalted butter, melted
For the Ice Cream Layers:
- 1.5 quarts (6 cups) chocolate ice cream, softened slightly
- 1.5 quarts (6 cups) peanut butter ice cream (or vanilla ice cream mixed with ½ cup creamy peanut butter), softened slightly
For the Filling and Topping:
- 10–12 mini peanut butter cups, chopped (plus extra for garnish)
- ½ cup creamy peanut butter, warmed slightly
- 1 cup hot fudge sauce or chocolate ganache
- 2 cups whipped topping (like Cool Whip) or homemade whipped cream
Optional Garnish:
- Drizzle of melted peanut butter
- Drizzle of chocolate sauce or ganache
- Crushed peanuts or peanut butter cup pieces
Step-by-Step Preparation Method
Step 1: Prepare the Crust
- Crush the cookies into fine crumbs using a food processor or by hand (in a ziplock bag with a rolling pin).
- Mix the crumbs with melted butter until evenly combined.
- Press firmly into the bottom of a 9-inch springform pan to form an even crust.
- Place in the freezer for 15–20 minutes to set.
Step 2: Add the Chocolate Ice Cream Layer
- Let the chocolate ice cream soften slightly at room temperature (about 10 minutes).
- Spread the chocolate ice cream evenly over the chilled crust.
- Sprinkle half of the chopped peanut butter cups over the ice cream layer.
- Freeze for about 45 minutes to firm up.
Step 3: Add the Peanut Butter Ice Cream Layer
- Soften the peanut butter ice cream (or mix vanilla ice cream with creamy peanut butter).
- Spread it gently over the chocolate layer.
- Drizzle a little warm peanut butter and hot fudge over the top.
- Add the remaining chopped peanut butter cups.
- Smooth the top and freeze again for 1–2 hours, until solid.
Step 4: Add the Whipped Topping
- Spread whipped topping over the entire cake in an even layer.
- Freeze for at least 3 hours, or preferably overnight, for best texture.
Step 5: Decorate
- Once the cake is fully frozen, remove it from the freezer 10 minutes before serving.
- Drizzle melted peanut butter and chocolate fudge over the top.
- Garnish with extra chopped peanut butter cups or chocolate shavings.
- Slice and serve immediately!
How to Serve This Recipe
Serve the Peanut Butter Cup Ice Cream Cake cold, with each slice drizzled with extra chocolate or peanut butter sauce for extra indulgence.
Pair it with a glass of milk, a cappuccino, or even a scoop of whipped cream on the side. For parties, pre-slice it and freeze the slices individually for quick serving.
Recipe Tips
- Soften, don’t melt the ice cream—this makes layering easier and prevents it from getting icy.
- Line your pan with parchment paper for easy removal.
- Freeze between layers—it helps maintain clean, distinct layers.
- Use good-quality fudge sauce or make your own for best flavor.
- Warm your knife before slicing for neat pieces.
Variations
- Reese’s Explosion Cake: Add crushed Reese’s Pieces candies between layers for extra crunch.
- Chocolate Lovers’ Version: Use double chocolate ice cream and drizzle with dark chocolate ganache.
- Brownie Base: Replace the cookie crust with a baked brownie base for a fudgier texture.
- Peanut Butter Oreo Version: Use Peanut Butter Oreos for the crust instead of regular ones.
- Salted Caramel Twist: Add a thin caramel layer between the ice cream layers for sweet-salty perfection.
Freezing and Storage
- Freezing: Keep covered with plastic wrap or foil for up to 2 months.
- Storage: Once sliced, place leftovers in an airtight container to prevent freezer burn.
- Serving Tip: Let it thaw at room temperature for 10–15 minutes before slicing for smooth cuts.
Special Equipment Needed
- 9-inch springform pan or deep cake pan
- Food processor or rolling pin (for crust)
- Rubber spatula
- Mixing bowls
- Offset spatula for layering
- Saucepan (for making fudge sauce or warming peanut butter)
FAQ
Q1. Can I make this ahead of time?
Yes! This is the perfect make-ahead dessert. Prepare it up to 2 days in advance and store in the freezer until ready to serve.
Q2. Can I use store-bought ice cream cake as a base?
You can, but this homemade version tastes much fresher and richer.
Q3. Can I use homemade ice cream?
Absolutely! Homemade ice cream (especially chocolate or peanut butter) makes it even more luxurious.
Q4. What if I don’t have peanut butter ice cream?
Use vanilla ice cream and swirl in ½ cup creamy peanut butter—it tastes just as amazing.
Q5. How do I prevent ice crystals?
Cover the cake tightly with plastic wrap and foil while freezing to keep air out.
Conclusion
The Peanut Butter Cup Ice Cream Cake is the ultimate no-bake dessert that satisfies every craving—creamy, chocolatey, nutty, and oh-so-decadent. It’s an absolute showstopper that’s both impressive and easy to make. Each bite is a perfect fusion of chocolate ice cream, peanut butter goodness, and crunchy cookie crust.
Whether you’re celebrating a birthday, summer BBQ, or just a weekend treat, this cake promises joy in every slice. Simple to make, rich in flavor, and loved by all—it’s a dessert you’ll find yourself making again and again.
Peanut Butter Cup Ice Cream Cake
Course: DessertsCuisine: AmericanDifficulty: Easy12
servings30
minutes6
hours6
hours30
minutesIngredients
For the Crust:
24 chocolate sandwich cookies (like Oreos), crushed into crumbs
¼ cup (60g) unsalted butter, melted
For the Ice Cream Layers:
1.5 quarts (6 cups) chocolate ice cream, softened slightly
1.5 quarts (6 cups) peanut butter ice cream (or vanilla ice cream mixed with ½ cup creamy peanut butter), softened slightly
For the Filling and Topping:
10–12 mini peanut butter cups, chopped (plus extra for garnish)
½ cup creamy peanut butter, warmed slightly
1 cup hot fudge sauce or chocolate ganache
2 cups whipped topping (like Cool Whip) or homemade whipped cream
Optional Garnish:
Drizzle of melted peanut butter
Drizzle of chocolate sauce or ganache
Crushed peanuts or peanut butter cup pieces
Directions
- Step 1: Prepare the Crust : Crush the cookies into fine crumbs using a food processor or by hand (in a ziplock bag with a rolling pin). Mix the crumbs with melted butter until evenly combined. Press firmly into the bottom of a 9-inch springform pan to form an even crust. Place in the freezer for 15–20 minutes to set.
- Step 2: Add the Chocolate Ice Cream Layer : Let the chocolate ice cream soften slightly at room temperature (about 10 minutes). Spread the chocolate ice cream evenly over the chilled crust. Sprinkle half of the chopped peanut butter cups over the ice cream layer. Freeze for about 45 minutes to firm up.
- Step 3: Add the Peanut Butter Ice Cream Layer :Soften the peanut butter ice cream (or mix vanilla ice cream with creamy peanut butter). Spread it gently over the chocolate layer. Drizzle a little warm peanut butter and hot fudge over the top. Add the remaining chopped peanut butter cups. Smooth the top and freeze again for 1–2 hours, until solid.
- Step 4: Add the Whipped Topping :Spread whipped topping over the entire cake in an even layer. Freeze for at least 3 hours, or preferably overnight, for best texture.
- Step 5: Decorate : Once the cake is fully frozen, remove it from the freezer 10 minutes before serving. Drizzle melted peanut butter and chocolate fudge over the top. Garnish with extra chopped peanut butter cups or chocolate shavings. Slice and serve immediately!